There is a particular frustration that comes from investing in world-class audio components only to hear a muddied, hum-laden signal because your rack is a tangle of cables and poorly seated gear. Disorganized equipment doesn't just look bad. It actively degrades the performance of every component in your chain, from turntable to amplifier. A methodical, deliberate approach to assembly protects your investment, extends component lifespan, and reveals the full sonic potential your system was built to deliver. This guide walks you through every stage: tools, layout planning, step-by-step build, and verification.
Table of Contents
- Essential tools and materials for audio rack assembly
- Planning your rack layout and cable management
- Step-by-step audio rack assembly instructions
- Testing, troubleshooting, and common mistakes
- What most audiophiles miss about rack assembly
- Upgrade your setup with a handcrafted HiFi rack
- Frequently asked questions
Key Takeaways
| Point | Details |
|---|---|
| Select the right rack | Choose a rack made from solid materials with proper ventilation and standardized width to ensure compatibility. |
| Plan your layout | Design the stack and label all cables to prevent clutter and sound interference. |
| Follow assembly steps | Assemble the rack in the correct order and install components methodically to avoid stability or connection issues. |
| Verify performance | Test for stability, noise, and heat, and troubleshoot immediately for long-term clarity and system health. |
Essential tools and materials for audio rack assembly
Before assembly, it's critical to prepare in terms of both physical tools and strong foundational choices in rack design. The rack itself is not passive furniture. It is a structural and acoustic platform that directly influences how your components perform.
Rack materials and what they mean for your system
Common rack materials each carry distinct acoustic and structural properties:
| Material | Acoustic character | Structural strength | Best suited for |
|---|---|---|---|
| Solid hardwood (walnut, oak, ash) | Natural resonance damping, warm character | High | Audiophile listening rooms |
| Steel | Neutral to bright, rigid | Very high | Studio and pro AV environments |
| Glass | Reflective, minimal damping | Moderate | Aesthetic-focused setups |
| Composite laminates | Variable, often unpredictable | Moderate | Budget or temporary builds |
Solid wood remains the preferred choice for audiophiles because its grain structure creates irregular pathways that scatter and absorb vibrational energy rather than amplifying it. Our solid wood HiFi rack guide covers the specific acoustic differences between walnut, cherry, ash, and oak in detail, which is worth reading before you commit to a rack material.
Industry standards: rack units and 19-inch width
Most professional and high-end consumer rackmount components are built around two key measurements. The 19-inch standard width is the universal dimension for rackmount equipment, and height is measured in rack units, abbreviated as U, where one U equals 1.75 inches. Understanding these standards before purchase prevents costly compatibility issues.
Ventilation is equally non-negotiable. Equipment that runs hot, particularly tube amplifiers and class A designs, needs open shelving or dedicated ventilation gaps between units. Our acoustic isolation guide addresses how shelf spacing intersects with both thermal management and vibration control.
Tools you will need
Gather these before you open a single box:
- Hex wrenches (metric and imperial sets)
- Phillips and flathead screwdrivers
- A quality spirit level (digital preferred for precision)
- Cable ties and velcro straps
- A permanent marker for labeling
- Needle-nose pliers
- Torque screwdriver (optional but recommended for consistent fastener tightening)
- Measuring tape
Pro Tip: When selecting your rack, choose one with at least two to four extra U of capacity beyond your current needs. Systems grow. Adding a phono stage, a network streamer, or a power conditioner later is far easier when the rack already has room.
Planning your rack layout and cable management
With the rack and tools ready, thoughtful configuration and cable planning ensures both performance and simplicity during and after assembly. Rushing this stage is one of the most common and costly mistakes audiophiles make.
Designing your vertical stack
Your component placement should follow a logical signal flow from top to bottom, balanced against weight distribution and heat management. A well-considered stack typically looks like this:
- Source components (turntable, CD transport, streamer) at the top or on a dedicated isolated shelf
- Digital-to-analog converter (DAC) or preamp in the middle zone for short signal runs
- Power amplifier on a lower shelf, where its weight lowers the rack's center of gravity
- Power conditioner or distribution unit at the very bottom, close to the wall outlet
This arrangement minimizes signal cable length between source and preamp, which reduces the opportunity for noise pickup. It also keeps your heaviest components low, which improves rack stability.
Cable management: a comparison of methods
Not all cable management approaches are equal. Here is how the most common methods compare:
| Method | Noise reduction | Ease of access | Aesthetics | Cost |
|---|---|---|---|---|
| Velcro straps | Good | Excellent (reusable) | Clean | Low |
| Plastic cable ties | Good | Poor (single use) | Moderate | Very low |
| Cable looms/sleeves | Moderate | Moderate | Excellent | Moderate |
| Dedicated cable trays | Excellent | Good | Very clean | Higher |
| Loose routing (no management) | Poor | Good | Poor | None |
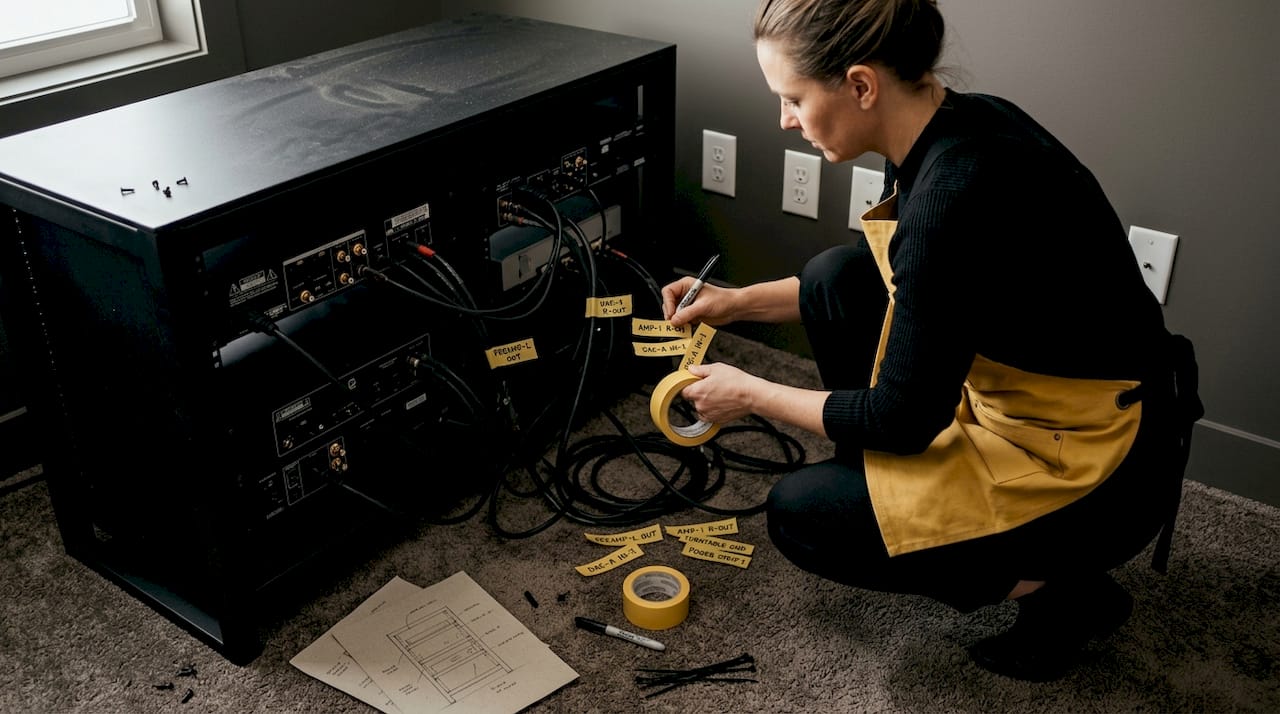
"Labeling cable ends and separating AC and power lines from analog signal runs are the two most impactful practices for reducing noise and simplifying troubleshooting in any rack-based home audio system." Wiring the Modern Hi-Fi Stack
Separating power cables from signal cables is not just a best practice. It is a measurable noise reduction strategy. AC cables radiate an electromagnetic field that can induce hum into sensitive analog interconnects when the two run parallel and in close proximity. Route them on opposite sides of the rack, or at minimum, cross them at 90-degree angles when they must intersect.
Label every cable at both ends before installation. Use a marker directly on masking tape wrapped around the cable, or invest in a label printer. This single step saves hours of troubleshooting later. Understanding what makes a good HiFi rack includes recognizing how well-designed cable routing channels contribute to long-term system clarity.
Pro Tip: Sketch your layout on paper before touching a single cable. Note which cables run where, their approximate lengths, and which side of the rack each type occupies. This sketch becomes your reference throughout assembly and is invaluable during future upgrades.
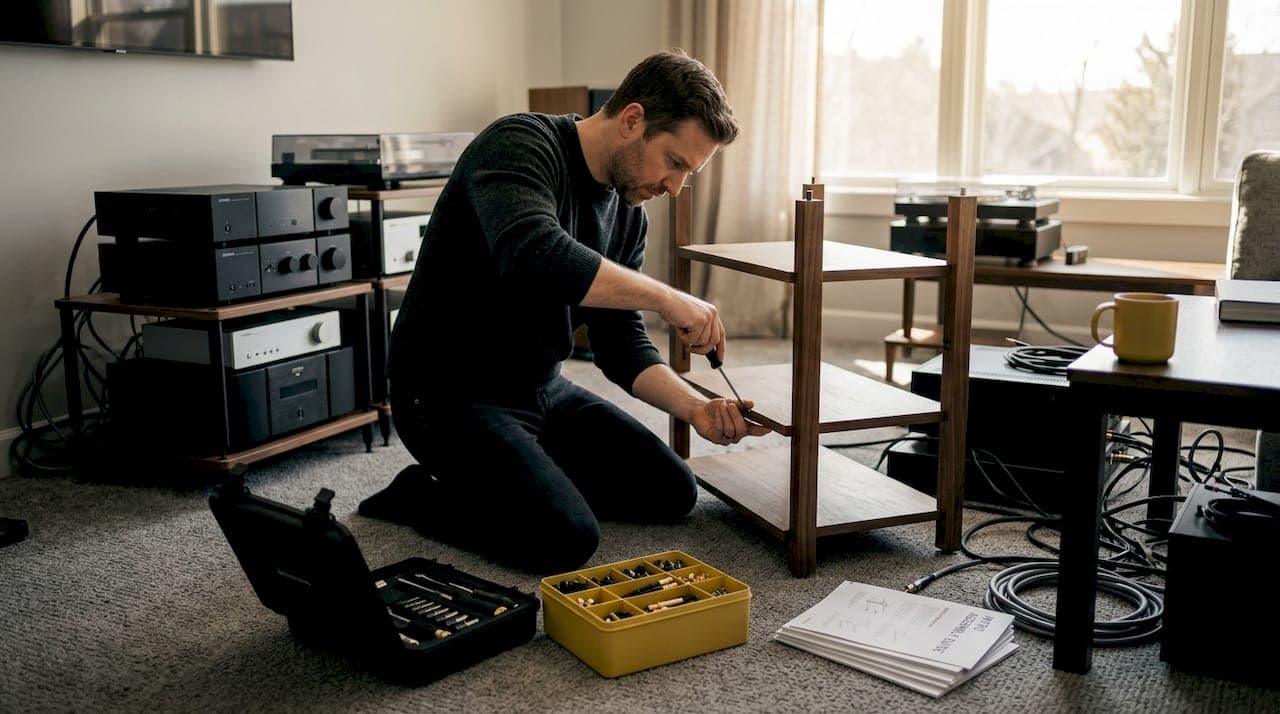
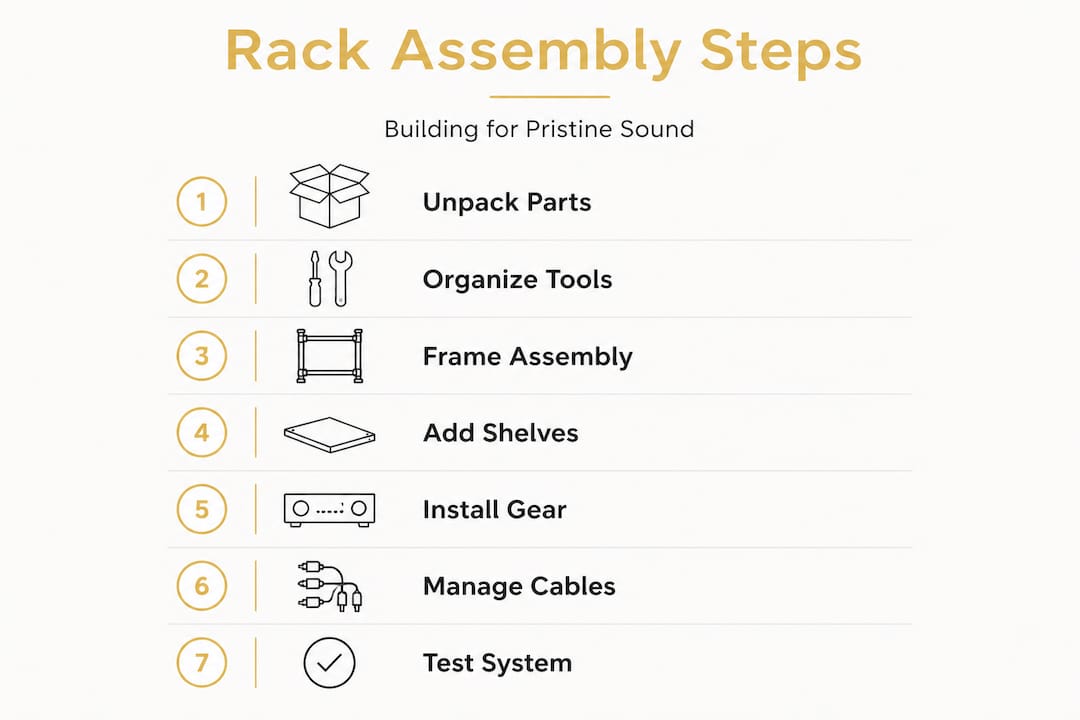
Step-by-step audio rack assembly instructions
Once cables are prepped and layout finalized, you're ready to build. Move methodically and deliberately. Each step builds on the last, and skipping ahead creates problems that are difficult to diagnose later.
The assembly sequence
-
Unpack and inspect all rack components. Lay out every panel, shelf, fastener, and bracket. Check for damage, warping, or missing hardware before you begin. Attempting to fix a structural flaw mid-assembly is far more disruptive than catching it at the start.
-
Level the floor area and prepare the footprint. If your rack uses adjustable feet or spikes, set them to their approximate final height. Place the rack frame in its intended position and use your spirit level to confirm the floor is workable. Significant floor slope will need to be compensated at the feet.
-
Assemble the frame sections. Follow the manufacturer's sequence exactly. Tighten fasteners in a cross pattern (similar to wheel lug nuts) to distribute clamping force evenly. Avoid fully torquing any single bolt until all fasteners are finger-tight, which prevents the frame from racking out of square.
-
Level the assembled frame. With the bare frame upright, adjust feet or spikes until the top surface reads level in both axes. Solid wood racks with heavy spikes provide excellent coupling to the floor and minimize the vibrational energy that would otherwise travel up into your components.
-
Mount shelves from the bottom up. Starting at the bottom ensures you have clear access to each shelf as you work upward. Confirm each shelf is level before moving to the next. A shelf that is even slightly out of level can cause turntable tracking issues or amplifier transformer hum from mechanical stress.
-
Install components in order of weight, heaviest first. Power amplifiers and integrated amplifiers belong on the lower shelves. Source components and DACs go above. This keeps the rack's center of gravity low and reduces the risk of tipping.
-
Route power cables first, then signal cables. Run your power cables along one side of the rack interior, secured with velcro straps at regular intervals. Then route your signal interconnects along the opposite side. Where the two must cross, do so at a right angle and keep the crossing point brief.
-
Double-check all labels, organize cable slack, and secure. Excess cable length should be looped neatly and tied, not crammed behind components. Forced bends and compressed cable bundles can degrade signal integrity and create mechanical stress on connectors.
According to rack assembly best practices, maintaining proper ventilation clearance between components is as important as the structural build itself, particularly for equipment that generates significant heat.
Pro Tip: After mounting each component, power it on individually before connecting it to the rest of the system. This confirms the component is functioning correctly and isolates any issues introduced during mounting.
You can find additional audio setup tips and real-world audio rack inspiration to refine your approach as your system evolves.
Testing, troubleshooting, and common mistakes
Assembly complete, now it's time to ensure peak performance and address the most frequent sources of error or oversight. A rack that looks finished may still have hidden issues that only reveal themselves under listening conditions.
Verification checklist
Work through these checks before your first serious listening session:
- Structural stability: Push gently on each corner of the rack. There should be zero wobble. If the rack rocks, recheck foot leveling and fastener torque.
- Shelf levelness: Recheck every shelf with your spirit level. Even a 0.5-degree tilt can affect turntable performance.
- Ventilation clearance: Confirm at least one U (1.75 inches) of open space above any component that runs warm. Tube amplifiers and class A solid-state designs may need two U or more.
- Cable tension: No cable should be under tension at its connector. A cable pulling on an RCA or XLR jack introduces mechanical stress and eventual signal degradation.
Listening test and diagnosing hum
Power up your system and listen carefully at low volume before playing music. A 60 Hz hum (a low electrical buzz) typically indicates a ground loop, which occurs when two components share a ground path through both the signal cable and the AC circuit. The most common fix is to ensure all components share a single power strip or conditioner connected to one wall outlet.
"Separating AC and power lines from analog signal runs is the single most effective step for reducing noise in a rack-based audio system." Wiring the Modern Hi-Fi Stack
If you hear intermittent crackling or channel dropout, reseat every interconnect firmly. A partially seated RCA plug is a surprisingly common culprit, particularly after components have been moved during installation.
The most common assembly mistakes
- Overcrowding shelves: Cramming components together blocks airflow and makes future access nearly impossible.
- Skipping cable labels: Without labels, every future change or troubleshooting session becomes a guessing game.
- Ignoring airflow: Heat is the primary enemy of component longevity in a closed rack environment.
- Mixing power and signal runs: Even a few inches of parallel routing between a power cable and a sensitive interconnect can introduce audible noise.
When selecting the right rack from the outset, prioritize designs that build cable routing and ventilation into the structure rather than treating them as afterthoughts.
What most audiophiles miss about rack assembly
Stepping back from the technicalities, there is a mindset issue that we see repeatedly, and it costs people more sonic performance than any budget component ever could.
The assumption is that once the rack is built and the cables are in, the work is done. In our experience, the opposite is true. Assembly is the beginning of an ongoing refinement process, not a one-time task. We have seen systems where a single forced cable bend at the back of a preamp introduced enough signal degradation to mask the difference between two interconnect cables that the owner had spent considerable money comparing.
Minor shortcuts accumulate. Inconsistent labeling leads to rushed reconnections during future changes, which leads to incorrectly routed cables, which leads to noise that gets blamed on the components rather than the installation. The rack becomes a source of problems rather than a foundation for performance.
What we recommend instead is a practice of incremental verification. After each assembly step, pause and test. Power on, listen, check temperatures, confirm stability. This approach catches subtle issues before they compound. It also builds a clear mental map of your system that makes future troubleshooting far faster.
Understanding what makes a good HiFi rack goes beyond specifications. It includes recognizing that the rack's design should actively support this kind of careful, iterative approach, with accessible cable routing, adjustable shelving, and a structure that rewards patience rather than punishing it.
Patience is not a soft skill in this context. It is the difference between a system that performs at 70 percent of its potential and one that delivers everything your components are capable of.
Upgrade your setup with a handcrafted HiFi rack
If you're ready to take your home audio system to the next level, expert-crafted racks make all the difference. The foundation you build on shapes every listening experience that follows.

At hifi-rack.com, we design and handcraft solid wood HiFi racks and speaker stands from responsibly sourced hardwoods including walnut, cherry, ash, and oak. Each piece is built with the audiophile's workflow in mind: thoughtful cable routing channels, adjustable shelving, and heavy spikes for vibration damping that couples the rack firmly to the floor. Our four-generation woodworking heritage means every joint, every surface, and every finish reflects a standard of quality that factory-built alternatives simply cannot match. Shop our HiFi racks to find the right foundation for your system, or explore the Myro Racks and Stands collection for a refined starting point that balances acoustic performance with natural beauty.
Frequently asked questions
What is a typical 19-inch rack and why does it matter?
A 19-inch audio rack is the industry-standard width that ensures compatibility with the vast majority of rackmount audio components and simplifies future system upgrades without requiring new furniture.
How should I organize cables in my rack?
You should separate power and signal cables, label both ends of every cable before installation, and keep cables free of tension at their connectors to reduce noise and ease future troubleshooting.
Can poor ventilation in my audio rack affect sound quality?
Yes. Poor ventilation causes component overheating, which degrades sensitive circuits over time, shortens component lifespan, and can introduce thermal noise that directly impacts sound quality and reliability.
What is the best order to install components in the rack?
Place the heaviest components, typically power amplifiers, on the lowest shelves first, then work upward with progressively lighter source and signal processing equipment to optimize both stability and cooling airflow.